2010-04-30

【重灌】 Ubuntu 10.04 把 sun-java6-jre 移掉了…

0 comments

今天灌好 Ubuntu 10.04 後,發現 sun-java6-jre 怎麼都裝不起來了。

Google 一下,原來是被移掉了…現在改用 openjdk 來取代

參考: 在 Ubuntu Lucid 下请回 Sun Java6 Jre, 赶走 OpenJDK

但之前都用的好好的,所以我還是灌 sun-java6-jre 吧。


方法如下:

# sudo vi /etc/apt/sources.list

加上

deb http://ftp.sjtu.edu.cn/ubuntu/ karmic multiverse

接著

# sudo apt-get update

# sudo apt-get install sun-java6-jre


搞定。

【系統】jpegtran : ffmpeg 產生的縮圖在 facebook 上無法顯示!!

0 comments

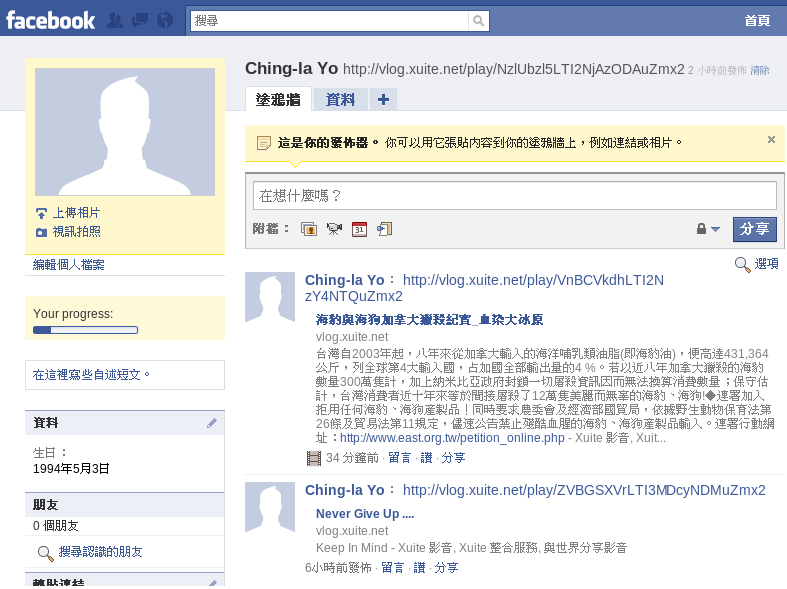
最近發現從 Vlog 分享到Facebook 上的影片,都看不到縮圖,真是見到鬼了… ( 見上圖 )

後來 Mr. Kusan 有Google 到一篇文章:
Videos shared to Facebook and images/thumbnails generated with ffmpeg

原來是 Facebook 的 safe_image.php 在產生縮圖時,沒辦法處理 ffmpeg 產生出來的縮圖。

詳細的原因,在上面那篇文章中都有寫。

解決的方式就是使用 jpegtran 來 fix 這個問題。

原文:
To make this work with ffmpeg generated (thumbnail) images, you've to apply some sort of a fix. The jpegtran utility is perfect for the job, because it writes JPEG images only with a JFIF marker in the header and it does not recompress the image (thus image quality is preserved).

好,那我們就來裝裝 jpegtran 吧 ( 但記得系統要先有裝 libjpeg )

OS : SLES 10 & 11

至 http://www.ijg.org/ 下載 jpegsrc.v8a.tar.gz 

# wget http://www.ijg.org/files/jpegsrc.v8a.tar.gz

# tar -zxvf jpegsrc.v8a.tar.gz

# cd jpeg-8a

# ./configure

# make ; make install

目前為止,就正式裝完了。

執行 jpegtran 他居然出現:
jpegtran: error while loading shared libraries: libjpeg.so.8: cannot open shared object file: No such file or directory

查詢一下 libjpeg.so.8 在那

# whereis libjpeg.so.8
libjpeg.so: /usr/lib/libjpeg.so.62 /usr/lib/libjpeg.so.6 /usr/local/lib/libjpeg.so /usr/local/lib/libjpeg.so.8

明明就有呀!

所以照 Garlic 說的,這就是 Include PATH 的問題了。

# vi /etc/profile.local
# Add PATH
export LD_LIBRARY_PATH=/usr/local/lib

重新登入,執行 jpegtran 已經不會再出現錯誤訊息了。

然後將 ffmpeg 產生的圖片用 jpegtran 再跑一次。

# jpegtran -outfile fixed_image.jpg input.jpg

然後再次到 Facebook 看,縮圖總算出來了。

Facebook 的 safe_image.php 大概只會 Cache 一段時間,所以之前沒有縮圖的只要修正好後,過一段時間就會出現了。

結果如下圖 :

太好了~~解決了!!


PS. 

今天 Ubuntu 10.04 正式 Release 了

我要準備來灌 Ubuntu 10.04 了!! 耶!! 


2010-04-28

【系統】HP : Enable PXE Boot Support for Embedded NIC

0 comments

因為之前已經有裝好PXE Server了,所以之後的安裝,當然都要用PXE來裝,才不會浪費PXE這個好物。

可是我明明就在開機的時候,按 F12 說要用 PXE 來 Boot,可是他就是都沒有抓到 IP。

結果… 又是靠 Garlic ,原來是要將 Embedded NICs 設定 PXE 為 Enable,否則…預設是 Disable。

好~來記錄一下吧。

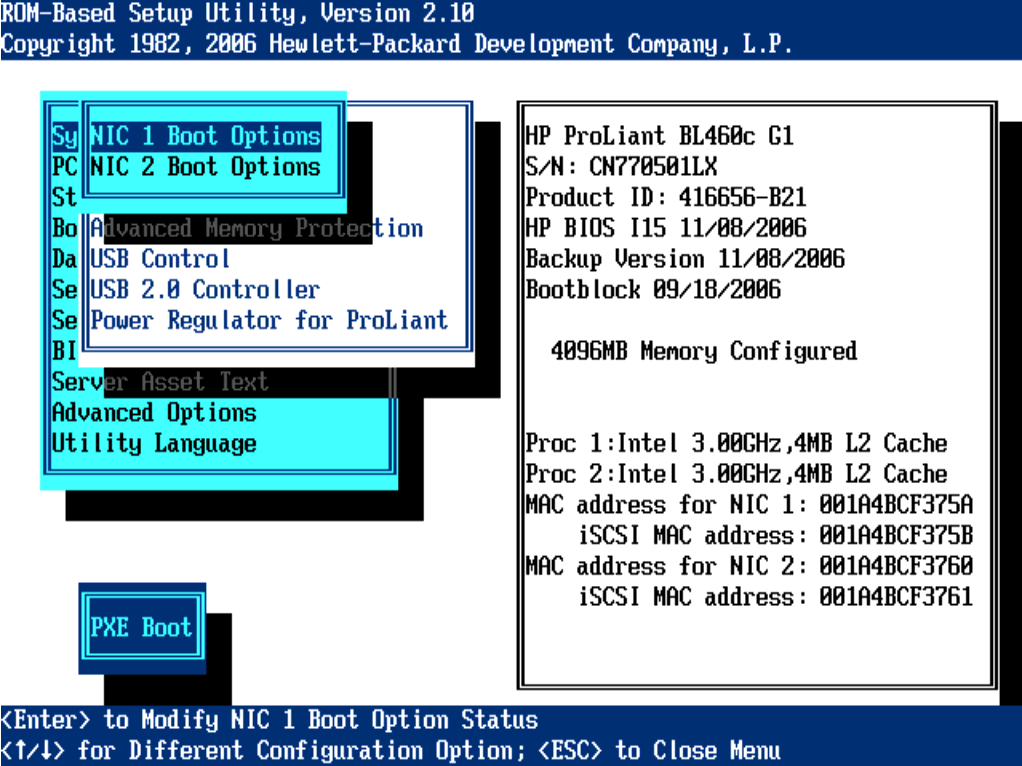
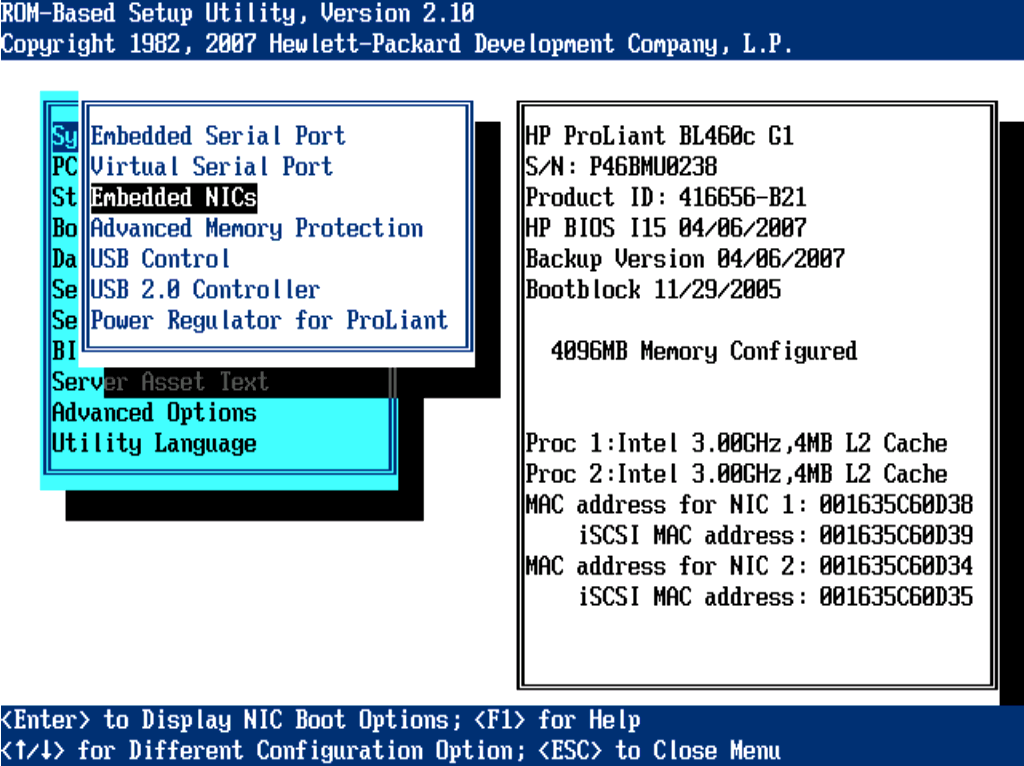
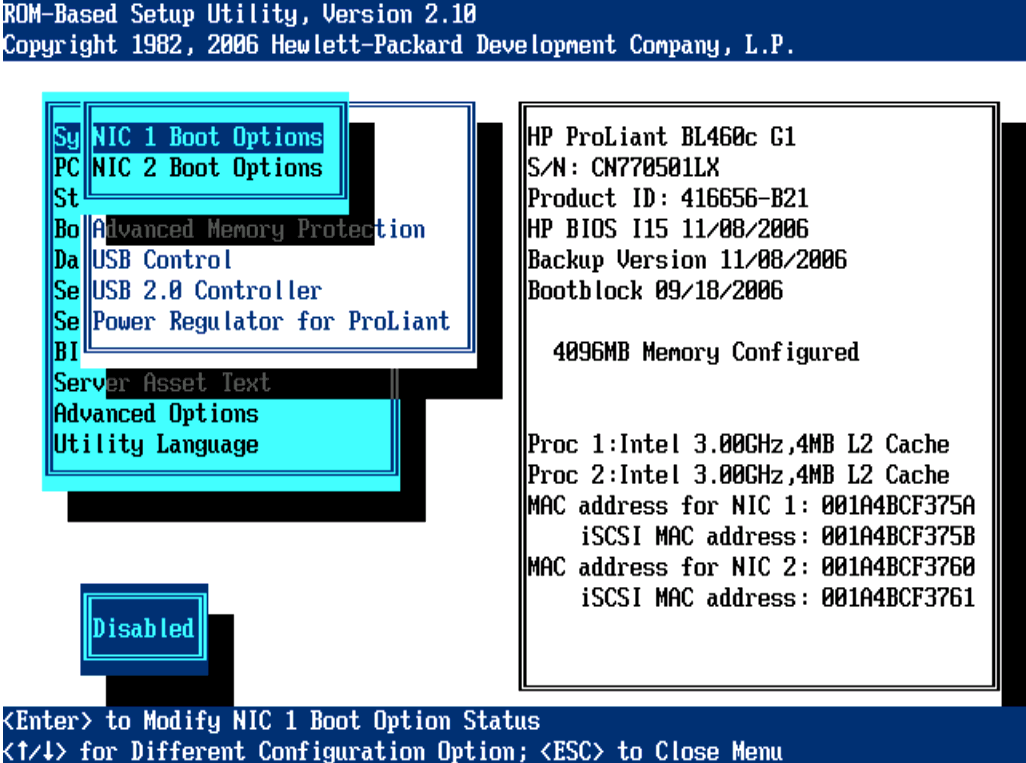
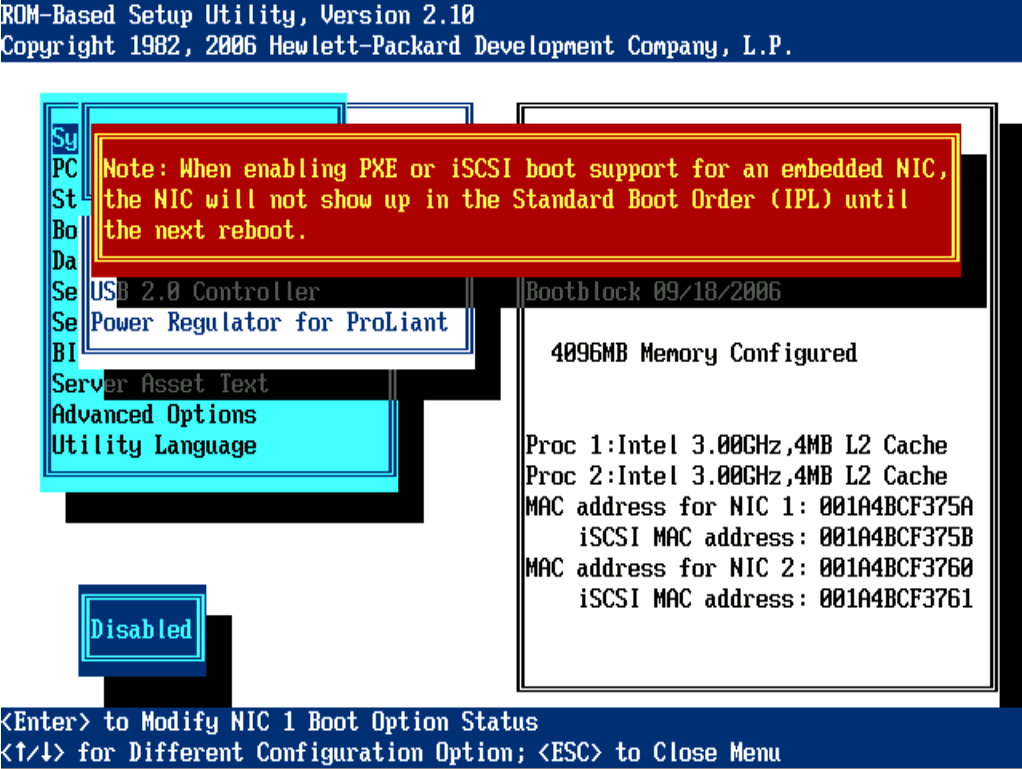
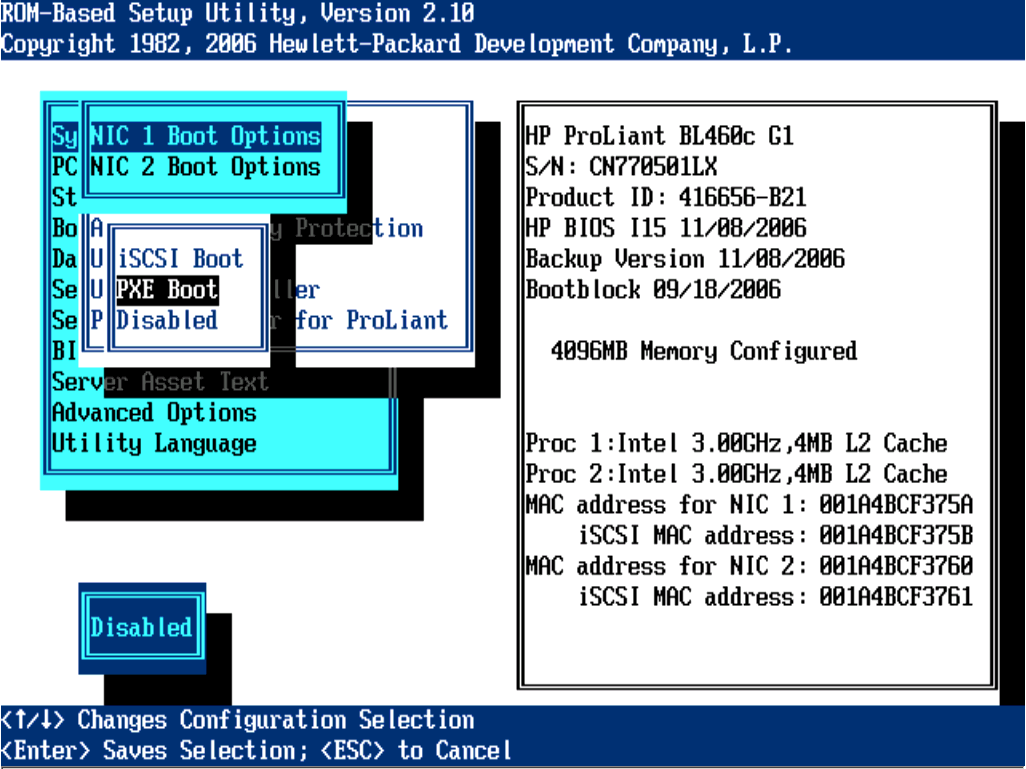
步驟是:System Options > Embedded NICs > NIC 1 Boot Options > PXE Boot

Step By Step

System Options > Embedded NICs

System Options > Embedded NICs > NIC 1 Boot Options (可以看到下面是顯示 Disabled )

會出現 Note

System Options > Embedded NICs > NIC 1 Boot Options > PXE Boot

System Options > Embedded NICs > NIC 1 Boot Options > PXE Boot (選完後,你看下面,他顯示 PXE Boot了)

重開機,就可以輕鬆的用 PXE 安裝 Server 囉~耶~

【系統】HP : kernel requires an x86_64 cpu .... !!

0 comments


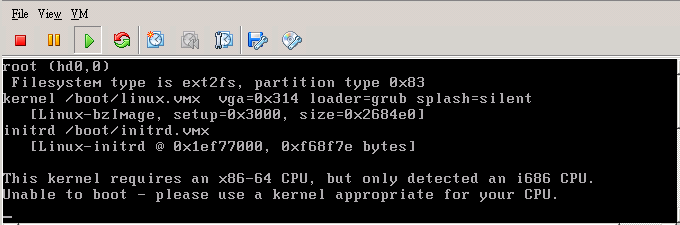
當我用VM Ware 在安裝 x64 的 OS 時,他出現了下面的錯誤訊息:

kernel requires an x86_64 cpu, but only detected an i686 cpu
unable to boot - please use a kernel appropriate for your cpu

經 Garlic 說明,是要進去BIOS裡面將 VT Enable 即可。

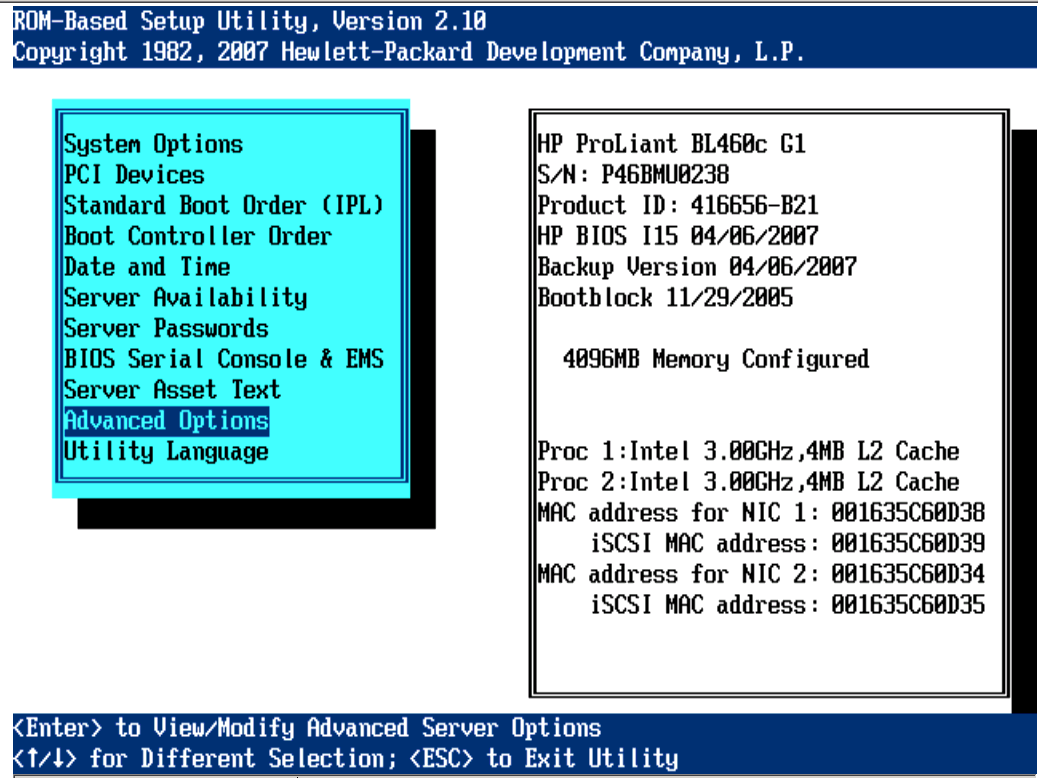
首先進iLO,然後重開Server,按 F9 進入設定畫面。

接著就依序
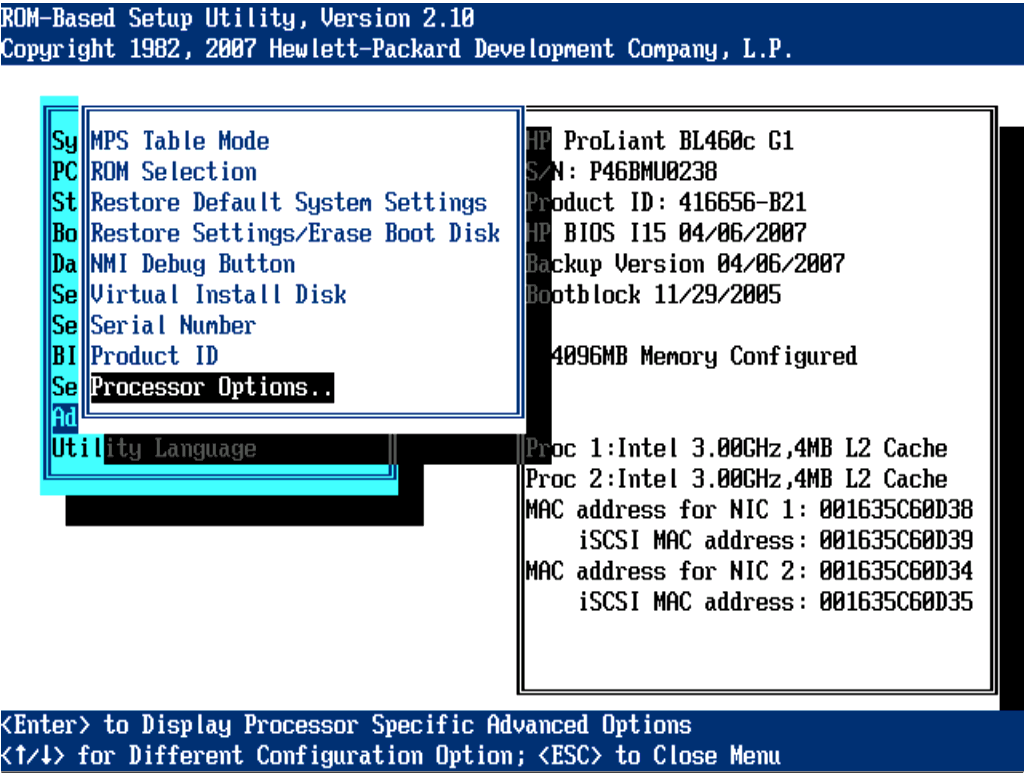
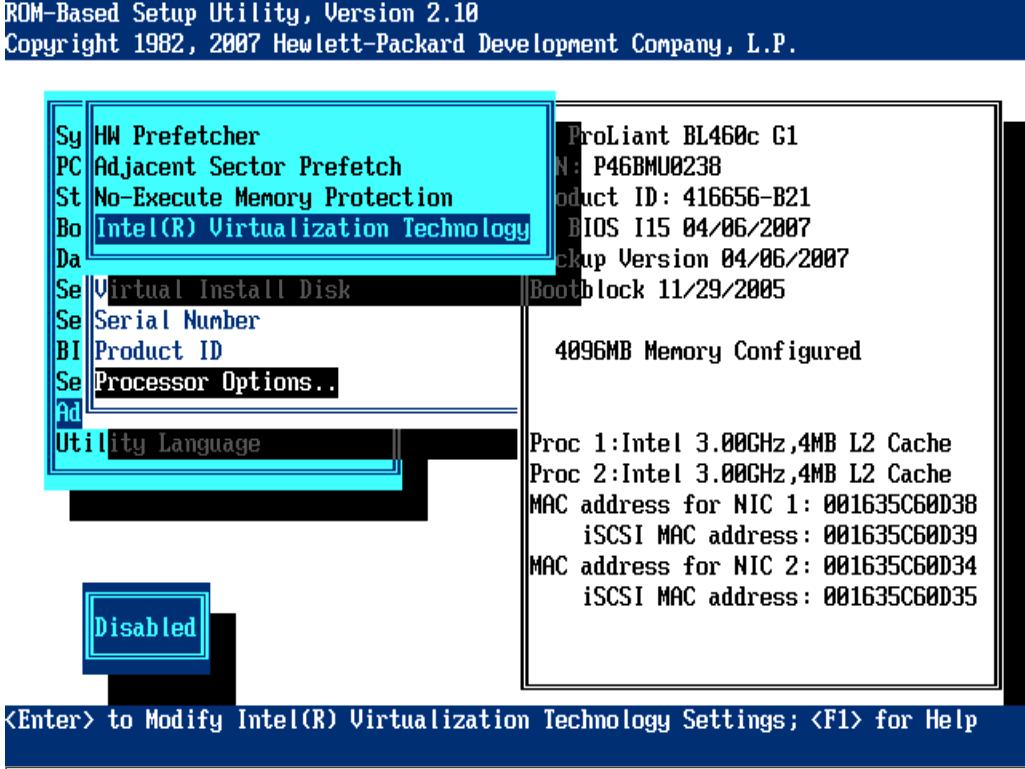
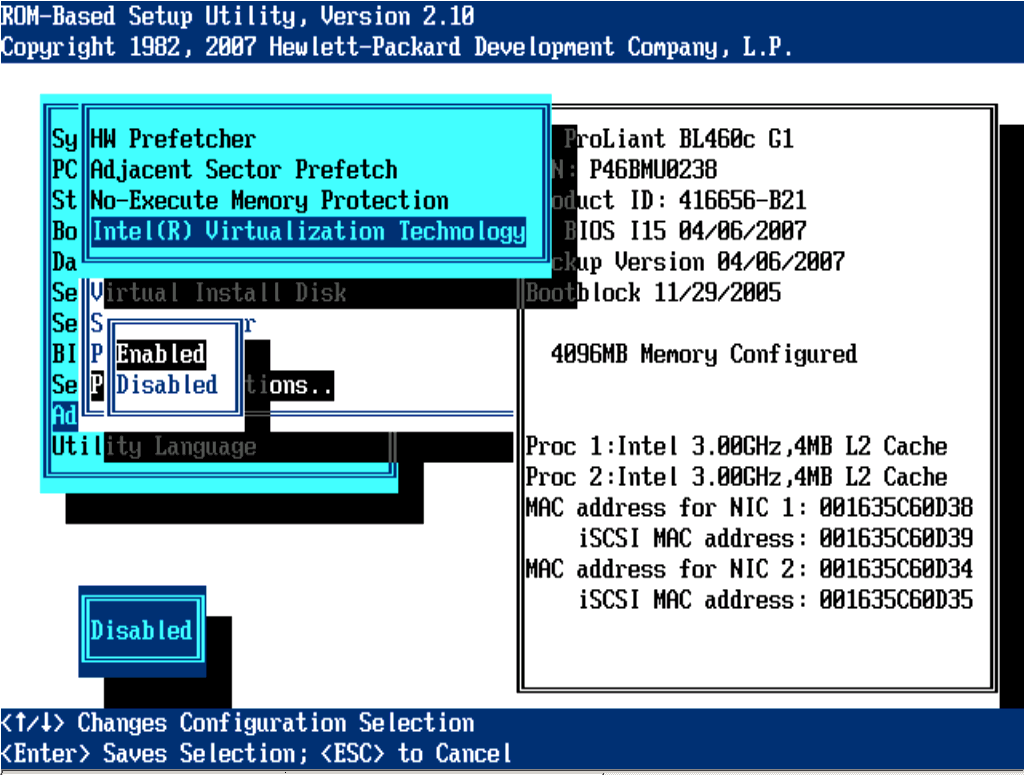
Advanced Options > Processor Options .. > Intel (R) Virtualization Technology > Enabled

下面來個 Step By Step .....

選擇 Advanced Options

Advanced Options > Processor Options ..

Advanced Options > Processor Options .. > Intel (R) Virtualization Technology

Advanced Options > Processor Options .. > Intel (R) Virtualization Technology > Enabled


接著重新開機,搞定~~

但太舊的 Server 可能就沒有支援 VT 了~~

2010-04-26

【系統】HP : The Remote Console is unavailable .... !!

0 comments

在使用HP ProLiant BL460c G1  的 iLO 時。

如果已經開了一個 Remote Console,沒關掉,

又要再開一個時,就會出現

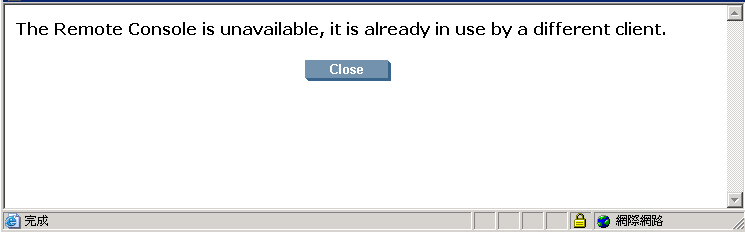
The Remote Console is unavailable, it is already in use by a different client.

如下圖的資訊。但你也不知道是誰在用,而且明明只有自己在用…(應該是不正常關掉吧…)

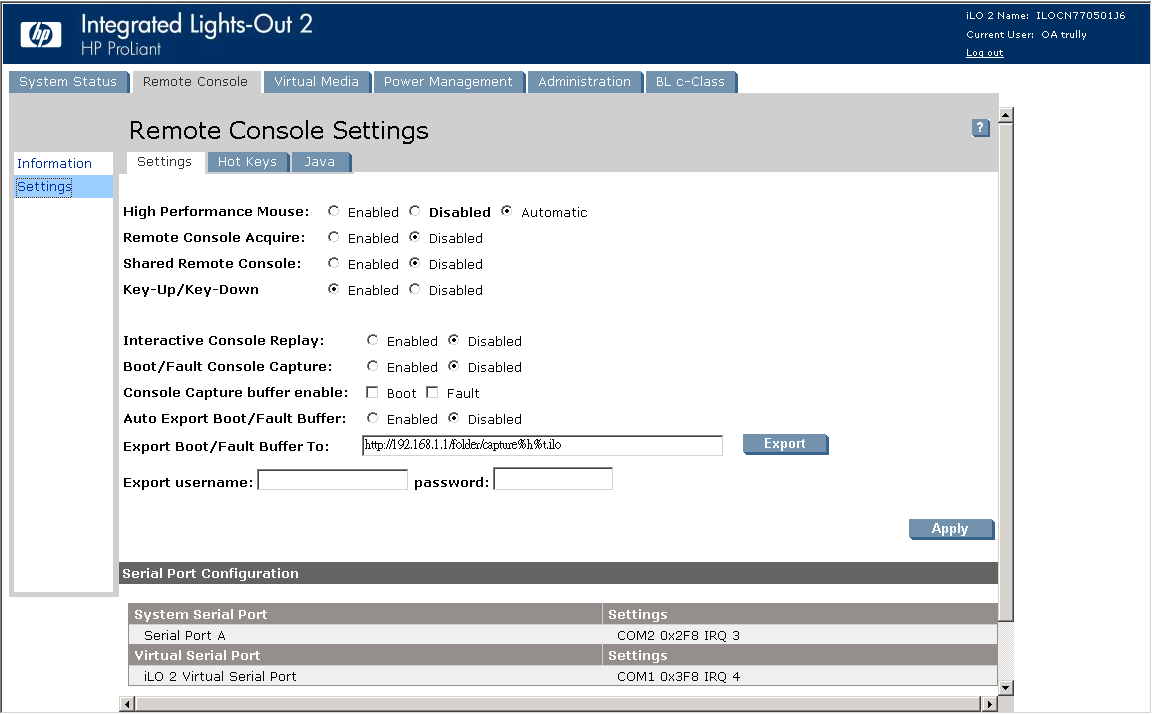
這時就進入 iLO 畫面的 Remote Console > Settings 將 Remote Console Acquire 改成 Enabled。

或是將 Shared Remote Console 改成 Enabled。

我是Enable Acquire 那個,如下圖:

然後再打開Remote Console後,就會多一個 Button 叫 Acquire,按下去就搞定了。

2010-04-13

【程式】Shell Script : 顯示某資料匣下的 inode 數量 (檔案數)

0 comments

突然需要知道某個資料匣下的 inode 數量,

一時也不知道該怎麼查,後來查了一下,原來 inode數 = 檔案數

那這個就比較清楚了,那我就計算檔案數就好了。

所以就寫了隻Shell Script 來查詢某資料匣下的檔案數總合。

結果如最上面的圖。

程式如下 - filecounter.sh:

#!/bin/sh
for dn in $(find $1 -type d)
do
        size=`find $dn -maxdepth 1 -type f | wc -l | sort -gr`
        echo -e "$size \t $dn"
        counter=`expr $counter + $size`
done

echo =======================================
echo $1
echo =======================================
echo Total Files : $counter

執行方法

sh filecounter.sh folder-path

Ex :
        # sh filecounter.sh /home/chingwei/Desktop/

搞定~收工~


2010-04-09

【系統】Lighttpd : 安裝 H264 Streaming Module

0 comments

因為工作上,有用到 Streaming 的東西。

這裡來記錄一下怎麼在 Lighttpd 上安裝 Mod-H264 Module 。

環境:
    Lighttpd - 使用 lighttpd-1.4.26
    OS - SLES 11

H264 網站:H264 Streaming Module for Lighttpd

安裝方式,其實就照H264網站上面寫的做就可以了。

下面簡單記錄一下:

# wget http://download.lighttpd.net/lighttpd/releases-1.4.x/lighttpd-1.4.26.tar.gz
# tar -zxvf lighttpd-1.4.26.tar.gz


# wget http://h264.code-shop.com/download/lighttpd-1.4.18_mod_h264_streaming-2.2.9.tar.gz
# tar -zxvf lighttpd-1.4.18_mod_h264_streaming-2.2.9.tar.gz


# cp lighttpd-1.4.18/src/mod_h264_streaming.c lighttpd-1.4.26/src/
# cp lighttpd-1.4.18/src/mod_streaming_export.h lighttpd-1.4.26/src/
# cp lighttpd-1.4.18/src/moov.c lighttpd-1.4.26/src/
# cp lighttpd-1.4.18/src/moov.h lighttpd-1.4.26/src/
# cp lighttpd-1.4.18/src/mp4_io.c lighttpd-1.4.26/src/
# cp lighttpd-1.4.18/src/mp4_io.h lighttpd-1.4.26/src/
# cp lighttpd-1.4.18/src/mp4_reader.c lighttpd-1.4.26/src/
# cp lighttpd-1.4.18/src/mp4_reader.h lighttpd-1.4.26/src/
# cp lighttpd-1.4.18/src/mp4_writer.c lighttpd-1.4.26/src/
# cp lighttpd-1.4.18/src/mp4_writer.h lighttpd-1.4.26/src/
# cp lighttpd-1.4.18/src/mp4_process.c lighttpd-1.4.26/src/
# cp lighttpd-1.4.18/src/mp4_process.h lighttpd-1.4.26/src/
# cp lighttpd-1.4.18/src/output_bucket.c lighttpd-1.4.26/src/
# cp lighttpd-1.4.18/src/output_bucket.h lighttpd-1.4.26/src/
# cp lighttpd-1.4.18/src/output_mp4.c lighttpd-1.4.26/src/
# cp lighttpd-1.4.18/src/output_mp4.h lighttpd-1.4.26/src/


# vi lighttpd-1.4.26/src/Makefile.am


#(for example, just after 'mod_flv_streaming')
lib_LTLIBRARIES += mod_h264_streaming.la
mod_h264_streaming_la_SOURCES = mod_h264_streaming.c \
                                mod_streaming_export.h \
                                moov.c moov.h \
                                mp4_io.c mp4_io.h \
                                mp4_reader.c mp4_reader.h \
                                mp4_writer.c mp4_writer.h \
                                mp4_process.c mp4_process.h \
                                output_bucket.c output_bucket.h \
                                output_mp4.c output_mp4.h 
mod_h264_streaming_la_CFLAGS = $(AM_CFLAGS) -DBUILDING_H264_STREAMING
mod_h264_streaming_la_LDFLAGS = -module -export-dynamic -avoid-version -no-undefined
mod_h264_streaming_la_LIBADD = $(common_libadd)


# cd lighttpd-1.4.26
# ./autogen.sh
// The 'enable-maintainer-mode will trigger a rebuild of all makefiles by autoconf ...
# ./configure --enable-maintainer-mode --prefix=/home/lighttpd
# make
# make install


接著設定一下 lighttpd.conf

# vi lighttpd.conf
server.modules = ( 
  ...,
  "mod_h264_streaming",
  ...
)
h264-streaming.extensions = ( ".mp4" )

然後啟動 Lighttpd ,就搞定了。

測式方式:可參考 - Testing the H264 Streaming Module

Ex: 抓test.mp4,從150秒開始
wget -O test-1.mp4 "http://10.10.10.1/test.mp4?start=150"

得到的檔案跟原本的檔案比,應該會比較小,這就表示正確了。


最後再把這個Lighttpd + Mod_H264包成 RPM。

以後只要 rpm -Uvh lighttpd 就搞定了,耶~~


2010-04-02

【生活】Garlic & Carol 從日本九州帶回來的伴手禮

0 comments

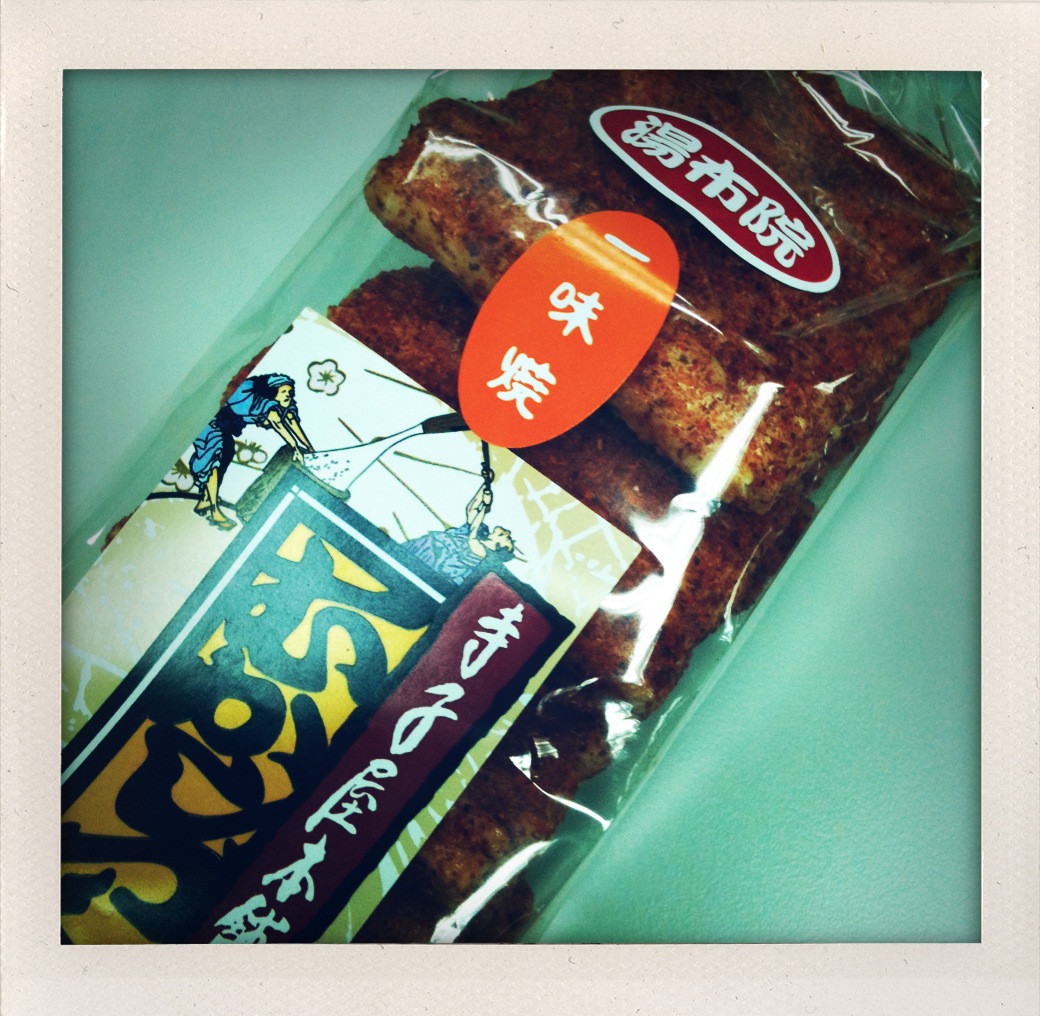
唷~~金厚~~有伴手禮。

是很硬很硬的仙貝,Patty 的最愛。

謝謝大好人~~ Garlic & Carol ~

待在台灣就有東西吃~哈~真好~

【程式】PHP - gzencode 後變亂碼 !!

0 comments


昨天同事說 js 用 php 的 gzencode 壓縮後,會變亂碼。

所以就看了一下。

程式如下:

    header('Content-type: text/javascript');
    header('Vary: Accept-Encoding');
    header('Expires: '.gmdate('D, d M Y H:i:s', time() + 3600).' GMT');
    header('Content-Encoding: gzip');
    
    $str = file_get_contents('js/_util/jquery-1.3.2.min.js');
    $str = gzencode($str); 
    echo $str;

查了一下,原來是在 php.ini 就已經設定了 zlib.output_compression = On。

當設定了 zlib.output_compression = On 又在程式中使用 gzencode ,

這樣子,輸出就會變成亂碼了。

所以簡單的作法,就是【將程式中的 gzencode 拿掉】即可。

// $str = gzencode($str); 

因為已經在 php.ini 設定好要 compression 了。

拿掉後,結果就正常了。


PS.

雖然 Lighttpd 中也有設定

compress.filetype          = ("text/plain", "text/html", "text/css", "text/javascript" )

但這個是跟 Lighttpd 沒關系的,因為是從 PHP 去吐的。所以是跟 php.ini 設定檔有關。

在這裡做個記錄。


2010-04-01

【系統】使用 du 來看磁碟的使用空間

0 comments

要查看空間,就是使用 du 來看。

但資料沒整理過很亂,下面來講一下,該怎麼用 du 最方便。

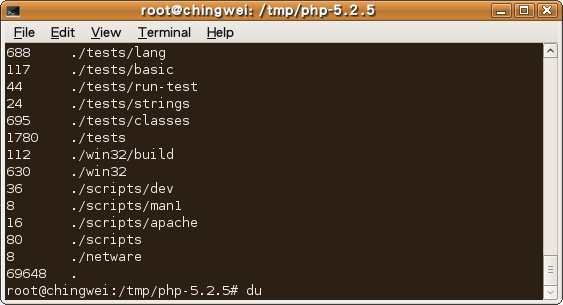
下圖是直接執行 du ,資料很多,而且子目錄下的所有檔案都會列出來,看得很累~~不好用
# du

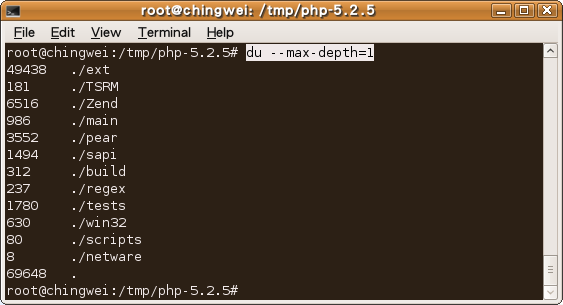
所以我們設定,最多只顯示一層,清楚多了。但 Size 預設是 K ,有點小
# du --max-depth=1

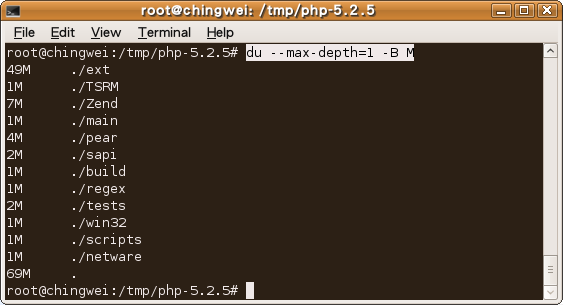
加上 -B M ,表示使用 MB來顯示,如果是加 G ,就是  GB 了。
# du --max-depth=1 -B M

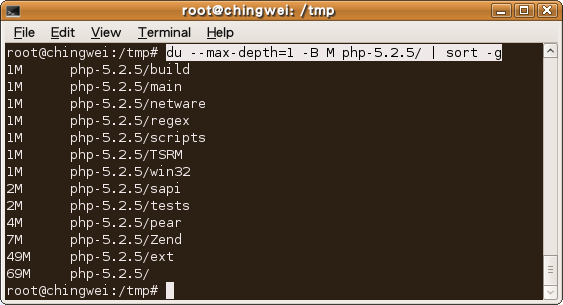
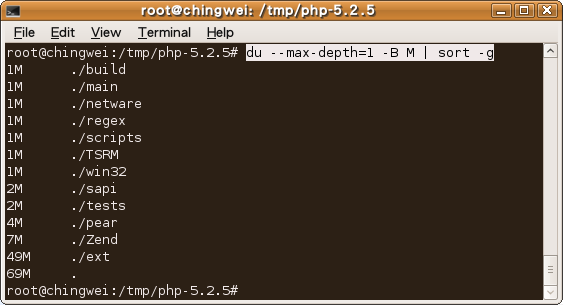
但如果很多,我還要特地看是那個檔占最多空間,麻煩,加上 sort -g 來排序
# du --max-depth=1 -B M | sort -g

上面就可以看的很清楚,那個東西占最多的空間了。
如果要針對某個目錄的話。就直接加在後面就好了。
# du --max-depth=1 -B M php-5.2.5/ | sort -g


總結:就是使用 # du --max-depth=1 -B M | sort -g 就對了啦