
一直以為 Prepared Statement 是DB 會自動去產生…
結果後來發現,原來不是……

最近將原本的程式全都用 Zend Framework 來改寫,
前端的部份已經完成了70%了吧!
先來看一下之後要跑的一些 Cron ,要怎麼用 Zend Framework 來執行。
看到一篇文章說的非常非常的清楚,而且一下子就搞定了。
我這裡來簡單記錄一下。
cron.php
define(“_CRONJOB_”,true);
require('/home/www/web/public/index.php’);

//... rest of your code goes here, you can use all Zend components now!
然後在 index.php 最後面加上
//.........略
$application->bootstrap();

/** Cronjobs don’t need all the extra’s **/
if(!defined('_CRONJOB_') || _CRONJOB_ == false) {
    $application->bootstrap()->run();
}
這樣就搞定了。
現在可以把你的程式加到 Cron 中執行了~~
另外在這裡,再補充一下,你也可以直接從 application.ini 裡設定的 DB 資訊,來建DB connection
程式片段如下:
define("_CRONJOB_",true);
require('/home/www/web/public/index.php’);
$bootstrap = $application->getBootstrap();
$bootstrap->bootstrap('db');
$dbAdapter = $bootstrap->getResource('db');
$dbAdapter->getConnection();
$stmt = $dbAdapter->select()->from('TABLE')->where("ID='119'")->query();
$result = $stmt->fetchAll();

之前光是要產生資料列表,還有分頁,都很麻煩。
要先查出這頁要顯示的資料,然後還要計算所有的資料筆數
才能計算出總頁數,進而產生出 分頁 Bar。
現在有了 Zend_Paginator 就超方便的了,
簡簡單單就可以把所有事情搞定。
現在來個 Sample 吧。可以參考 Chapter 39. Zend_Paginator
首先在 application/Bootstrap.php,我加了一個 _initRouter
主要用來將某些 Request ,導到對應的 Controller。
// application/Bootstrap.php
/**
 * 設定 routing rules
 * @author chingwei
 */
protected function _initRouter() {
    $front = Zend_Controller_Front::getInstance();
    $router = $front->getRouter();
    $router->addRoute('media_user',
        new Zend_Controller_Router_Route_Regex(
            '_user/([\w\-\.]+)\*{0,1}(\d*)\/{0,1}$',
            array('controller' => 'ching', 'action' => 'user'),
            array(1 => 'viewId', 2 => 'page'),
            '_user/%s*%d'
        )
    );
}
接著在 Controller 裡將所有的資料產生出來,然後交給 Zend_Paginator
// application/modules/default/controllers/ChingController.php
$allMedia = $mediaModel->getMediaBySn($sn);
$paginator = Zend_Paginator::factory($allMedia);
$paginator->setCurrentPageNumber($page);
$paginator->setItemCountPerPage(3);
$this->view->paginator = $paginator;
然後在 View 中,下面中前面的程式碼就是產生最上面那張圖中的三個項目。
然後後面的Code 是指定要用那個樣版來產生分頁 Bar
// application/modules/default/views/ching/test.phtml
<? if (count($this->paginator)): ?>
<ul>
<? foreach ($this->paginator as $item): ?>
  <li><?= $item['TITLE']; ?></li>
<? endforeach; ?>
</ul>
<? endif; ?>
<?= $this->paginationControl($this->paginator,
                        'Sliding',
                        '/ching/_pagination.phtml'); ?>
最後面這個就是分頁樣版了
// application/modules/default/views/ching/_pagination.phtml
<? if ($this->pageCount): ?>
<div class="paginationControl">
<!-- Previous page link -->
<? if (isset($this->previous)): ?>
  <a href="<?= $this->url(array('page' => $this->previous)); ?>">
    < Previous
  </a> |
<? else: ?>
  <span class="disabled">< Previous</span> |
<? endif; ?>
<!-- Numbered page links -->
<? foreach ($this->pagesInRange as $page): ?>
  <? if ($page != $this->current): ?>
    <a href="<?= $this->url(array('page' => $page)); ?>">
        <?= $page; ?>
    </a> |
  <? else: ?>
    <?= $page; ?> |
  <? endif; ?>
<? endforeach; ?>
<!-- Next page link -->
<? if (isset($this->next)): ?>
  <a href="<?= $this->url(array('page' => $this->next)); ?>">
    Next >
  </a>
<? else: ?>
  <span class="disabled">Next ></span>
<? endif; ?>
</div>
<? endif; ?>
以上~搞定!

Zend Framework 在執行 SQL 時,會先再跑一個 SQL,取得 Metadata 資訊後,
才會真正的執行你的 SQL。
所以如果將 Metadata Cache 後,就可以減少一個 SQL 語法,讓 DB 不至於被操到死~~
可以參考:Zend_Db_Table > Caching Table Metadata
我的環境是 : Zend Framework 1.9.5
我在 application > Bootstrap.php
加入:
<?php
class Bootstrap extends Zend_Application_Bootstrap_Bootstrap {
    protected function _initDbTableCache() {
        // 設定 metadata cache
        $fOpt = array(
            'automatic_serialization' => true
        );
        $bOpt = array(
            'cache_dir' => '/tmp/_zf_cache'
        );
        $cache = Zend_Cache::factory('Core', 'File', $fOpt, $bOpt);
        Zend_Db_Table_Abstract::setDefaultMetadataCache($cache);
    }
    //...... 略
之後只要有 Cache ,就不會再去 DB 查 Metadata 了。
但如果你的 Table 有修改過,可能就要記得去清一下 Cache 了。
我是還沒改過Table ( Alter Table),不確定是不是一定要清,但感覺是要。
下圖,加入 Cache 後,就沒有再去查 Metadata 了。

搞定~
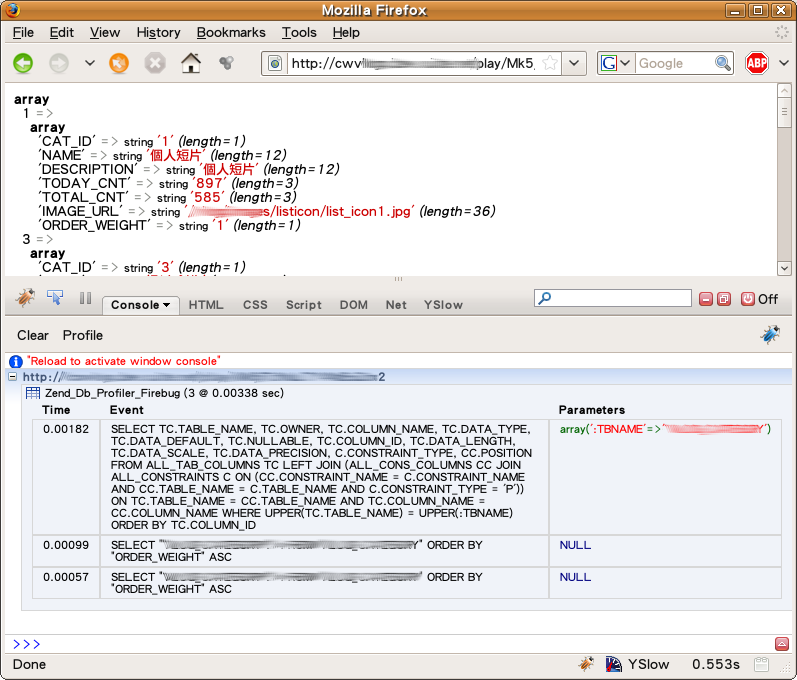
使用 Firebug 來顯示 DB Profiling 的資訊,真的挺好用的。
上面的圖中,就會顯示執行此頁時,所有執行的 SQL 語法。
可參考:Zend_Db_Profiler
環境:
用法如下:
// In your bootstrap file
$profiler = new Zend_Db_Profiler_Firebug('All DB Queries');
$profiler->setEnabled(true);
// Attach the profiler to your db adapter
$db->setProfiler($profiler)
// Dispatch your front controller
// All DB queries in your model, view and controller
// files will now be profiled and sent to Firebug
我是直接在 application > configs > application.ini
裡加上下面資訊,就搞定了。
; 設定 db profiler
resources.db.params.profiler.enabled    = true
resources.db.params.profiler.class      = Zend_Db_Profiler_Firebug
既簡單又方便~
設定好後,所有 DB Profiling 的資訊,都會在 Firebug 上顯示了。
修改 Firefox 的 config,讓Firefox可以自動將ed2k的連結與aMule關連。
說明如下:
環境..
Ubuntu 9.04
Firefox 3.0.11
aMule 2.2.4
假設目前 aMule 及 Firefox 都裝好了。
接著就來設定 Firefox
這樣子就完成了~~
END~~
Smarty 用習慣了,還是會想使用 Smarty 來當樣版
所以就找了一下該怎麼將 Smarty 放進 Zend Framework
找到一篇寫的不錯的文章,簡單易懂:
Zend Framework: Using Smarty as template engine
那我這裡也來說明一下~~
有點小改,因為我是使用ZF 1.8,但差別不大,只差在Registry
這裡寫一下我的做法..
首先在 index.php 建立 smarty object
require_once('Zend/Registry.php');
require_once('Smarty/libs/Smarty.class.php');
$smarty = new Smarty();
$smarty->debugging = false;
$smarty->force_compile = true;
$smarty->caching = false;
$smarty->compile_check = true;
$smarty->cache_lifetime = -1;
$smarty->template_dir = 'templates';
$smarty->compile_dir = 'templates_c';
Zend_Registry::set('smarty', $smarty);
然後只要在controller class裡,取回smarty object,然後就照原本的寫法,就可以使用了。
class IndexController extends Zend_Controller_Action
{
  function indexAction()
  {
    $smarty = Zend_Registry::get('smarty');
    $smarty->assign('title', 'Test');
    $smarty->display('bala.tpl');
  }
}
夠簡單吧~~
要用Zend,就要設定Rewrite Rule,因為他都是將request丟給index.php處理。
下面就是要如何設定。
Lighttpd
編輯
lighttpd.conf
加上
url.rewrite-once = (
".*\?(.*)$" => "/index.php?$1",
".*\.(js|ico|gif|jpg|png|swf|css|html)$" => "$0",
"" => "/index.php"
)
PS.忘了說,還要設定根目錄為: update 2009-06-16
server.document-root = "/home/www/chingwei/public/"
上面內容參考自
update 2009-11-25
在 Build PHP 時要記得加上 --enable-spl 這樣子Zend會用到的 spl_autoload_register 才可以正常執行。否則會出現下面的錯誤:
Call to undefined function spl_autoload_register()
如果有使用 eaccelerator ,則記得要使用 0.9.5.3 以上的版本。 0.9.5.2 會出現下面錯誤:
Fatal error: Cannot access protected property Zend_Loader_Autoloader::$_instance
安裝環境:
SUSE 11
Lighttpd 1.4.22
PHP-5.2.10