因為Big-5的檔案,看都會有亂碼,
所以就可以用iconv來將Big-5格式的檔案,
直接轉成Utf-8的格式。
Big-5 To Utf-8
- iconv -f big5 -t utf-8 big5.txt -o utf8.txt
Utf-8 To Big-5
- iconv -f utf-8 -t big5 utf8.txt -o big5.txt
因為Big-5的檔案,看都會有亂碼,
所以就可以用iconv來將Big-5格式的檔案,
直接轉成Utf-8的格式。
Big-5 To Utf-8
Utf-8 To Big-5


上禮拜程式執行時,居然出現這樣的錯誤訊息。
字面上看起來應該就是 Memory 的問題了。
所以解決的方法就是到 php.ini 將 memory_limit 加大。
# vi /php-etc-path/php.ini
將 memory_limit 改成
memory_limit = 128M
但數字是看各程式的需求。
另外也可以直接在程式中設定,但記得要放在整個程式的前面。
ini_set("memory_limit","128M");
?>
PS. 另外還有其他的設定
ini_set("max_execution_time",300000);
ini_set("max_input_time",600000);
補充說明 memory_limit : ( PHP Configuration )
memory_limit
The Memory section of the Official Requirements part of this document provides some sample values. After you consult the memory table you may decide on 12M as the correct value. You would then edit your php.ini with this value.
memory_limit = 12M
Trial and error may be required to find the right value depending on the limitations of your phpWebSite installation environment. As noted in the memory table the number of modules that you Boost with the core phpWebSite system will greatly affect how this parameter should be set. If the value in the memory_limit parameter is set too low, then you will receive fatal runtime error messages
Fatal error: Allowed memory size of m bytes exhausted (tried to allocate e bytes) in Unknown on line n
* where m is the the memory limit the was exhausted.
* where e is the number of bytes that the memory limit was exceed by.
* where n is the line number in the phpWebSite system code where the php memory limit setting was exhausted.
以上~
首先說明,本文內容九成九是從 ( Garlic ) 貼過來的,
我只是記錄一下幹過這件事~~然後再加上一些我在實作時的記錄。
好~~內文正式開始:
PXE Server ~~ 搞起來的話,要安裝新的 Server 就不再是費時的工作了。
這個是 Garlic 教的,主要都是照Garlic的步驟,但~~雖然裝起來了,
還是不太清楚是怎麼一回事…。
反正就先記錄一下吧。
大概的觀念就是 Client 開機時透過網路 DHCP 取得 IP ,
然後 TFTP -> PXE ,選擇安裝項目,結束。
首先 PXE Server 要安裝 DHCP 及 TFTP 還有 NFS
# zypper in dhcp
# zypper in dhcp-server
# zypper in tftp
# zypper in nfs-utils
接著設定開機就啟動
# chkconfig nfsserver 35
# chkconfig dhcpd 35
然後因為 PXE Server 主要是拿來安裝用的,
所以一定要有很多的安裝光碟的 ISO 檔。
現在就來將這些 ISO 檔設定成開機就自動 Mount 。
# vi /etc/fstab
/home/PXE/linux/ISO/SLES-11-DVD-x86_64-GM-DVD1.iso /home/PXE/linux/SLES/SLES11_1 iso9660 defaults,loop,ro 0 0
/home/PXE/linux/ISO/SLE-11-SDK-DVD-x86_64-GM-Media1.iso /home/PXE/linux/SLES/SLES11_SDK_1 iso9660 defaults,loop,ro 0 0
/home/PXE/linux/ISO/SLE-11-SDK-DVD-x86_64-GM-Media2.iso /home/PXE/linux/SLES/SLES11_SDK_2 iso9660 defaults,loop,ro 0 0
(記得 mount 的目錄要先建好,然後下面內容放在檔案最後面比較好)
有了上面這些 ISO ,就要再設定 NFS,這樣子Client 在安裝時才能掛載。
# vi /etc/exports
/home/PXE/linux 10.0.0.0/8(ro,no_root_squash,async)
/home/PXE/linux/SLES/SLES11 10.0.0.0/8(ro,no_root_squash,async)
/home/PXE/linux/SLES/SLES11_SDK_1 10.0.0.0/8(ro,no_root_squash,async)
/home/PXE/linux/SLES/SLES11_SDK_2 10.0.0.0/8(ro,no_root_squash,async)
接著來設定 DHCP Server
# vi /etc/dhcpd.conf
其中 server-name, next-server 我是指到 tftp server 的 ip 去, filename 那個也是和 pxe 有關的設定
( By Garlic )
option domain-name "chingwei.net";
option domain-name-servers 10.2.17.104;
default-lease-time 3600;
max-lease-time 72000;
ddns-update-style none; ddns-updates off;
log-facility local7;
subnet 10.0.0.0 netmask 255.0.0.0 {
        option routers                  10.2.255.254;
        option subnet-mask              255.255.0.0;
        range dynamic-bootp 10.10.1.100 10.10.1.199;
        server-name "10.10.1.1";
        next-server 10.10.1.1;
        filename "pxelinux.0";
}
# vi /etc/sysconfig/dhcpd
調整以下這行 (看你想要讓 eth0, eth1, ..... 來取得 ip)
DHCPD_INTERFACE="ANY" # 設成 ANY 就是都可以
( By Garlic )
然後是 TFTP Server
# vi /etc/xinetd.d/tftp   (把 disable 從 yes 改成 no)
# mkdir /tftpbook
# /etc/init.d/xinetd restart
接著就是 PXE Server 的設定了
# cp /usr/share/syslinux/pxelinux.0 /tftpboot
# mkdir /tftpboot/pxelinux.cfg
# vi /tftpboot/pxelinux.cfg/default
default harddisk
 # hard disk
 label harddisk
   localboot 0x80
 # SLES11
 label sles11
   kernel install-linux/sles11/kernel
   append initrd=install-linux/sles11/initrd ramdisk_size=65536
              install=nfs://10.10.1.1/home/linux/SLES11_1
              autoyast=nfs://10.10.1.1/home/linux/autoyast/esxi_sles11_s.xml
              textmode=1
 # rescue
 label rescue
   kernel linux
   append initrd=initrd splash=silent rescue=1 showopts
# mediacheck
label mediachk
  kernel linux
  append initrd=initrd splash=silent mediacheck=1 showopts
# bios test
label firmware
  kernel linux
  append initrd=biostest,initrd splash=silent install=exec:/bin/run_biostest showopts
# memory test
label memtest
  kernel memtest
implicit 1
gfxboot bootlogo
display message
prompt 1
timeout 600
# vi /tftpboot/message
           Welcome to SUSE Linux Enterprise Server 11!
0fTo start the installation enter 'linux' and press .07
Available boot options:
  harddisk  - Boot from Harddisk (this is default)
  sles11    - SuSE Linux Enterprise Server
  nolapic   - Installation - Local APIC Disabled
  failsafe  - Installation - Safe Settings
  rescue    - Rescue System
  firmware  - Firmware Test
  memtest   - Memory Test
'noacpi', 'nolapic', or 'failsafe' may be necessary on some tricky hardware.
Have a lot of fun...
# mkdir -p /tftpboot/install-linux/sles11
利用 mount -o loop sles11_disk1.iso /mnt, 把 mnt/boot/x86_64/loader 下面的 linux, initrd copy 到 /tftpboot/install-linux/sles11 下面的 kernel, initrd
接下來找到同網段的 server, 用網路開機, dhcp 起來後, 會看到一個要安裝什麼的選單 (就是剛才編輯的那個 message file), 打 sles11 後, 就會利用剛才寫在 default 檔案裏面的 boot option 去開機, 因為裏面寫的是 nfs install + autoyast, 所以就沒我們的事了, 過 20 分鐘再回來看, 應該就全部裝完了
以上內容 9成9 ( By Garlic ),我只是記錄一下幹過這件事~~
補充:
在 Client 可以下 showmount -e 10.10.1.1
看10.10.1.1 上有那些可以mount。
然後要Mount 就執行:
mount 10.10.1.1:/home/SLES11 /tmp/a
若要系統於開機時自動掛載 nfs 的檔案系統,可於 Client 端的 /etc/fstab 做如下設定:
# vi /etc/fstab
10.10.1.1:/home/sles11   /mnt/nfs nfs defaults 0 0
之前光是要產生資料列表,還有分頁,都很麻煩。
要先查出這頁要顯示的資料,然後還要計算所有的資料筆數
才能計算出總頁數,進而產生出 分頁 Bar。
現在有了 Zend_Paginator 就超方便的了,
簡簡單單就可以把所有事情搞定。
現在來個 Sample 吧。可以參考 Chapter 39. Zend_Paginator
首先在 application/Bootstrap.php,我加了一個 _initRouter
主要用來將某些 Request ,導到對應的 Controller。
// application/Bootstrap.php
/**
 * 設定 routing rules
 * @author chingwei
 */
protected function _initRouter() {
    $front = Zend_Controller_Front::getInstance();
    $router = $front->getRouter();
    $router->addRoute('media_user',
        new Zend_Controller_Router_Route_Regex(
            '_user/([\w\-\.]+)\*{0,1}(\d*)\/{0,1}$',
            array('controller' => 'ching', 'action' => 'user'),
            array(1 => 'viewId', 2 => 'page'),
            '_user/%s*%d'
        )
    );
}
接著在 Controller 裡將所有的資料產生出來,然後交給 Zend_Paginator
// application/modules/default/controllers/ChingController.php
$allMedia = $mediaModel->getMediaBySn($sn);
$paginator = Zend_Paginator::factory($allMedia);
$paginator->setCurrentPageNumber($page);
$paginator->setItemCountPerPage(3);
$this->view->paginator = $paginator;
然後在 View 中,下面中前面的程式碼就是產生最上面那張圖中的三個項目。
然後後面的Code 是指定要用那個樣版來產生分頁 Bar
// application/modules/default/views/ching/test.phtml
<? if (count($this->paginator)): ?>
<ul>
<? foreach ($this->paginator as $item): ?>
  <li><?= $item['TITLE']; ?></li>
<? endforeach; ?>
</ul>
<? endif; ?>
<?= $this->paginationControl($this->paginator,
                        'Sliding',
                        '/ching/_pagination.phtml'); ?>
最後面這個就是分頁樣版了
// application/modules/default/views/ching/_pagination.phtml
<? if ($this->pageCount): ?>
<div class="paginationControl">
<!-- Previous page link -->
<? if (isset($this->previous)): ?>
  <a href="<?= $this->url(array('page' => $this->previous)); ?>">
    < Previous
  </a> |
<? else: ?>
  <span class="disabled">< Previous</span> |
<? endif; ?>
<!-- Numbered page links -->
<? foreach ($this->pagesInRange as $page): ?>
  <? if ($page != $this->current): ?>
    <a href="<?= $this->url(array('page' => $page)); ?>">
        <?= $page; ?>
    </a> |
  <? else: ?>
    <?= $page; ?> |
  <? endif; ?>
<? endforeach; ?>
<!-- Next page link -->
<? if (isset($this->next)): ?>
  <a href="<?= $this->url(array('page' => $this->next)); ?>">
    Next >
  </a>
<? else: ?>
  <span class="disabled">Next ></span>
<? endif; ?>
</div>
<? endif; ?>
以上~搞定!

之前都是使用 Zend Studio 來開發,但到 Ubuntu 時,覺的字型有點糟~~
所以就改成 Aptana 了,這套軟體~真的還蠻不錯用的 ( 其實 IDE 也就是那樣…)
但畫面白白的,有時候看了很刺眼,我覺的我可能有畏光症……
所以都會把 Monitor 調到最暗,因此這次也想要把 Aptana 一併調暗,如上圖。
方法如下:
首先要先有 Color Theme 的檔案 ( xxxx.col )
如果要用我套用的這個,可以到: Aptana Studio IDE Dark Color Theme 下載。
下載後,就解壓,會有很多的 xxxx.col 檔。如下圖

接著開啟 Aptana ,然後打開一個 php 檔 (想改那種檔案-js-css-php....就開那個 )

在畫面中間按右鍵,選擇 Preferences...

在 Aptana > Editors > PHP > Editing > Colors: PHP 的畫面中,選擇 Import

到你存放 .col 的目錄中,選擇 php.col ,然後按 OK
接著你看到畫面,已經換 Style 了,但怎麼很多註解的地方,變成白色的??

這是因為還沒加上 PHP DOC 的 col。
在 Aptana > Editors > PHP > Editing > Colors: PHPDoc 的畫面中,選擇 Import

然後選擇 php_doc.col 接著按 OK

畫面都正常了,除了第一行的
上面搞定後,基本上 PHP 的部份都完成了。
接著來說明一下 JS 的部份,一樣開啟一個 JS 檔案,在畫面中間按右鍵,選擇 Preferences...

然後在 Aptana > Editors > JavaScript > Colors 的畫面中,選擇 Import

選擇 javascript.col 後,按OK

接著在 Aptana > Editors > ScriptDoc > Colors 的畫面中,選擇 Import

這次選 scriptdoc.col 後,按 OK

然後,現在連 JS 的,也套用好 Color Theme 了。

接著我的眼精就可以舒服的寫程式了~~

Zend Framework 在執行 SQL 時,會先再跑一個 SQL,取得 Metadata 資訊後,
才會真正的執行你的 SQL。
所以如果將 Metadata Cache 後,就可以減少一個 SQL 語法,讓 DB 不至於被操到死~~
可以參考:Zend_Db_Table > Caching Table Metadata
我的環境是 : Zend Framework 1.9.5
我在 application > Bootstrap.php
加入:
<?php
class Bootstrap extends Zend_Application_Bootstrap_Bootstrap {
    protected function _initDbTableCache() {
        // 設定 metadata cache
        $fOpt = array(
            'automatic_serialization' => true
        );
        $bOpt = array(
            'cache_dir' => '/tmp/_zf_cache'
        );
        $cache = Zend_Cache::factory('Core', 'File', $fOpt, $bOpt);
        Zend_Db_Table_Abstract::setDefaultMetadataCache($cache);
    }
    //...... 略
之後只要有 Cache ,就不會再去 DB 查 Metadata 了。
但如果你的 Table 有修改過,可能就要記得去清一下 Cache 了。
我是還沒改過Table ( Alter Table),不確定是不是一定要清,但感覺是要。
下圖,加入 Cache 後,就沒有再去查 Metadata 了。

搞定~
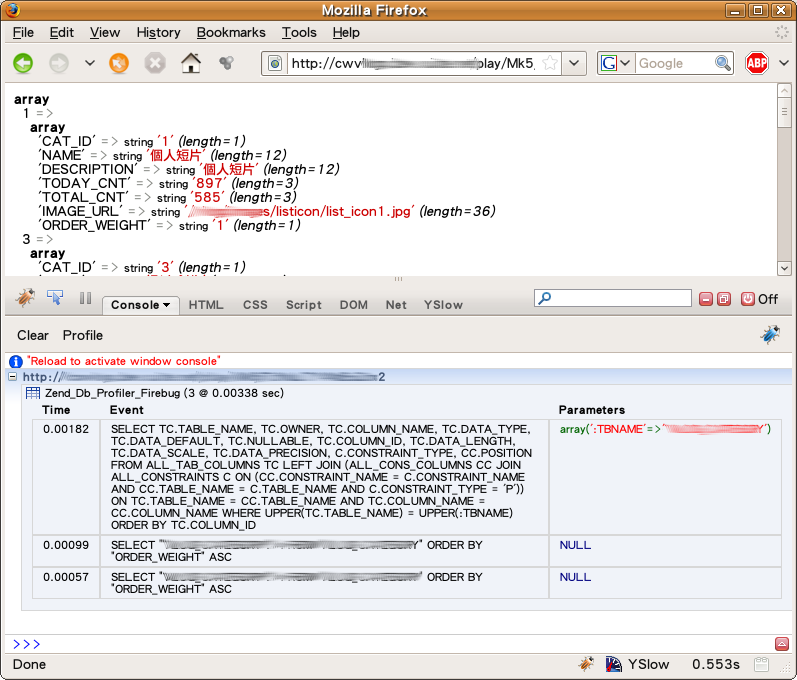
使用 Firebug 來顯示 DB Profiling 的資訊,真的挺好用的。
上面的圖中,就會顯示執行此頁時,所有執行的 SQL 語法。
可參考:Zend_Db_Profiler
環境:
用法如下:
// In your bootstrap file
$profiler = new Zend_Db_Profiler_Firebug('All DB Queries');
$profiler->setEnabled(true);
// Attach the profiler to your db adapter
$db->setProfiler($profiler)
// Dispatch your front controller
// All DB queries in your model, view and controller
// files will now be profiled and sent to Firebug
我是直接在 application > configs > application.ini
裡加上下面資訊,就搞定了。
; 設定 db profiler
resources.db.params.profiler.enabled    = true
resources.db.params.profiler.class      = Zend_Db_Profiler_Firebug
既簡單又方便~
設定好後,所有 DB Profiling 的資訊,都會在 Firebug 上顯示了。

換了 Ubuntu 後,很多在 Windows 下留下來的東西是 Big-5 的編碼,
所以在使用 Rhythmbox 和 Amarok 播放的時候,
常常會出現亂碼的問題。真是讓人看了很不爽快~~

這時候就要將編碼都轉成 UTF-8,就可以搞定了。
方式如下:
請見下圖,Rhythmbox 和 Amarok 都已經可以正常的顯示中文囉。


PS. 上面的音樂,我真的有買唱片,應該是沒犯法才對… I Love 王菲

之前在看影片時,常常覺的無聊就會快轉,可是快轉後,影片就不動了。
Google 了一下,原來是要將 Output driver 從 alsa 改成 pulse。
改法如下:
Options > Preferences

General > Audio ,畫面中,Output driver 預設是 alsa

將 alsa 改成 pulse

如下圖,就搞定了~

而且他也有加速播放的功能。按 [ (減速10%) or ] (加速10%)
真的很好用~~雖然還是輸 KMPlayer,不過在 Linux 上算超好用的了。

上次 Garlic 提到了 Ubuntu 可以自定快捷鍵,其實還真是簡單,就在
System > Preferences > Keyboard Shortcuts
裡面就可以看到預設的快捷鍵有那些。

因為 Terminal 還蠻常用到的,所以我就選擇了 Run a terminal,他就出現 New shortcut...
我輸入 Ctrl + 1 來當執行 Terminal 的快捷鍵。輸入完後按 Close。

接著 Close , 然後按 Ctrl +1 ,就會執行 Terminal 了。
另外如果要自訂執行特別指令的快捷鍵,就可以按 Add 來增加。

以上~~